
Creating Bootstrap Columns

What are Blocks and Regions?


On our very first OPEN LAB, we talk about a type of asset called a block, which is, in a manner of speaking, a piece of webpage that can be inserted into a region

We use MS Office 365 to create a request-for-information form, which then gives us a reference code. We create a block that contains that code.

Additionally, a block can contain almost any type of HTML content. So we add a header line (h1), and a new paragraph (p) containing the spacebar character (  ) to add some padding at the top of our form block. 

Also, we touch on editing the <TOP-NAV> format, which is the top navigation menu; and editing your own sidebar navigation menus inside a page. 

*please excuse the background chatter, as this was more-or less a test run of our Open Labs project 😅

Using the Media Gallery


Learn to create Gallery blocks, which compile images that are stored in a folder in creative ways.

Then, create  Gallery pages to contain those blocks, and display your image collection however you choose.


  Instructions

  1. Go to "Add Content", click on "Gallery", then click on "Media Gallery" folder.
  2. Name your folder and input Display Name and Title, click Submit.
  3. Go to "Add Content" again, click on "Make a new folder". Make sure the placement of this new folder is in the Gallery folder you created in step 1.
  4. Move the Gallery Block into your newest folder. This folder will hold your gallery images as well as the gallery block.
  5. To add images into your folder, go to "Add Content", then click on "Upload a file".
  6. To edit how the gallery looks, click on the Gallery Block, then click on "edit". Here you can choose your type of gallery and input a title for the gallery.


Take II

We take another crack at using of the Media Gallery. This time, as an alternate solution to a similar, and simpler module-- the Grid Builder.

Create  Gallery Blocks that automatically gather all images uploaded in the folder and arrange them in your preferred style. Then, create a Demo Page to display one (or more) of those Gallery Blocks.


Insert Your Own Text Areas

Add descriptive text to your gallery blocks. Navigate to the _demo-galleries folder and look for the block you want to add text to.

In the section labeled "Summary," type your text (or insert code) in this WYSIWYG area, very similarly to a Feature Text content row.

block text edit block text result

Work with Advanced Assets

  • Remove the deafult Request for Info form from the FORM region
  • Make a Block to display your own "News & Updates"
  • Replace the region with your own [ Dept News ] block
  • ALSO:
    Use the More > Versions option to restore to previous saved versions of an asset


The SETUP BLOCK

Customize your website's Department Name, Address, and Contact Details, in the SETUP BLOCK; assign a landing page on your Breadcrumbs. Also, how to personalize your social media buttons with approproate social media links.


Customize the Top Navigation Menu

If your navigation menu is custom, then you must manually update it.

SHORT VIDEO: Learn how to edit your navigation menu through the TOP NAV format.

NOTE: This is ONLY for manual (custom) navigations. More recent sandboxes are configured for auotmatic navigation update. If your site uses Automatic Top Menu, or you would like to make it automatic see here: Put the Top Menu on Auto!


Using the Blog

Learn to use the News and Events module, also known as the "Blog."

In your "News and Events" folder you will find two default pages of the type: Category Listing.

These type of pages automatically gather all posts that share the same Category and list them on one page. 

 
Begin your "blog" by creating new pages of the type: Post. These "posts" will be aggregated by the Category Listing page, which you can configure to choose from various display options.

You can have various catergories, and various category listings, or just the one you need!


On Part 2, we "promote" the Blog on our Home Page by adding an attractive button link.

Also, we use the new <blog-feed> format to replace the Facebook feed and display our own department's news and events!

*If you dont have the newest blog feed format, copy it over to your site from the Sample Dept > _assets
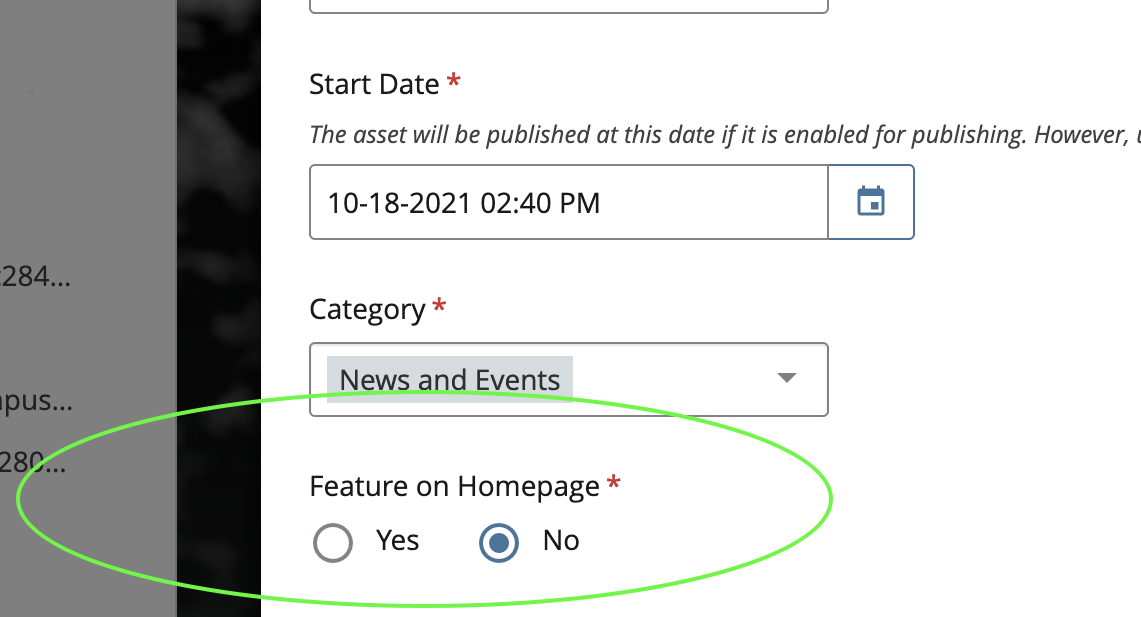

feat.png

Feature Your Posts

Don't forget to specify which posts you would like featured on the Blog Feed.  By default, posts are NOT set to feature to prevent crowding the feed. 

Scroll to the radio button labeled "Feature on Homepage" and the Yes button. Now this post will show up on the feed (sorted by date).

☝️ NOTE: Make sure to come back and change it back to No when it's time to give a newer post the spotlight!